 4-bit, 8-bit and 16-bit texture images as they appear logically in VRAM
This tutorial will teach you how to draw graphics with textures, from converting texture data to loading it onto VRAM, and finally drawing said texture. This is yet another essential part in PS1 graphics programming, as not having any textures would not always make for a pretty looking game.
This chapter will also cover some development tools to be used for preparing texture data, such as timtool and img2tim.
Compatible with PSn00bSDK: Yes
A texture in the context of graphics programming, is basically a bitmap of pixels that can either be drawn to the screen as a 2D image or mapped onto polygons to add textures on 3D models.
On the PS1 hardware, textures are naturally stored in VRAM alongside the display and drawing buffers described in previous tutorials. Textures are generally positioned outside of said visual areas so to not get overwritten by graphics frames drawn by the GPU. Once texture images have been loaded, it can then be drawn by textured sprite and/or polygon primitives.
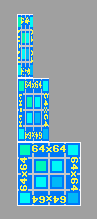
The PS1 supports texture color depths of 4, 8 and 16 bits per pixel. 4-bit and 8-bit textures are usually accompanied with CLUT or Color Lookup Table. A CLUT is essentially the color palette of its associated texture image.
Because the VRAM addresses pixels in 16-bit words, 4-bit and 8-bit textures are stored at quarter and half of the actual width of the texture respectively as shown in the image below.
4-bit, 8-bit and 16-bit texture images as they appear logically in VRAM
This also means that 8-bit textures must have a width that is of a multiple of 2 whilst 4-bit textures must be of a multiple of 4 to ensure that the pixel data is word-aligned in VRAM. Failing to do so will often yield artifacts, or corrupted texture images when trying to upload odd-width images into VRAM.
Texture images are usually handled on the PS1 in the TIM file format, which is a very simple image format designed specifically for the PS1 as it can hold X and Y coordinates for either image and CLUT data which are used as target coordinates when uploading the texture to VRAM. TIM files are typically created from regular image files (bmp, pcx, jpeg or bmp) with tools such as timtool included in the PsyQ/Programmer Tool SDK, img2tim which is a free command-line driven TIM converter and finally, timedit which is essentially a free albeit slightly dodgy equivalent of timtool.
For beginners it may be best to use timedit as its the only free tool (or at the very least one that I'm aware of) that features a graphical preview of the TIM image layout in VRAM or stick to timtool if you're using the PsyQ/Programmers Tool SDK.
A CLUT is simply a 16x1 or 256x1 16-bit pixel image that normally accompanies 4-bit and 8-bit texture images respectively. If you haven't guessed by now, a CLUT is essentially the color palette of the image it accompanies, where each pixel of the CLUT represents a 16-bit color entry for the texture image starting from the left (ie. the first pixel from the left represents the color for index 0 while the very last pixel of the CLUT represents the color for index 15 or index 255). CLUTs are normally used with 4-bit and 8-bit texture images, though it can also be used for procedurally generated textures such as animated plasma effects.
The TIM file format could support multiple CLUTs on a single TIM file, as the CLUT headers in the file format allow for more than 1 pixel high CLUTs. This is beyond the scope of this part of the tutorial series however.
You may have learned from the last tutorial that the PS1 accesses the VRAM as a two-dimensional image rather than a more conventional linear framebuffer. Well, this also applies on how textures in VRAM are 'selected' for drawing with textured primitives.
The PS1 addresses the VRAM in pages, in which the VRAM is divided into a grid of 16x2 cells of 64x256 16-bit pixels each. The actual texture page coordinates are still X,Y but with a 64x256 granularity instead. The image below visually illustrates the cells of each texture page.
 Texture page grid of the VRAM
Texture pages only applies to the selection of the area at which textures would be read from by textured graphics primitives, as VRAM coordinates of display and drawing environments do not adhere to this texture page granularity at all. Setting a texture page serves as an anchor point at which textured primitives would source texture data from starting from the top-left corner of the texture page, with the U,V coordinates of the primitive serving as an offset relative to the current texture page allowing small portions of a texture page to be read and drawn, such as animation frames of one particular character in a large sprite sheet.
 An example of using U,V coordinates to select a particular sprite (in this
case at 48,32) in a sprite sheet
An example of using U,V coordinates to select a particular sprite (in this
case at 48,32) in a sprite sheet
Of course this would mean that the texture images would have to be arranged such that it is placed on the top-right corner of a texture page boundary for the U,V coordinates to make the most sense. However, some simple offset translation based on the texture image's position relative to the page boundary should get around that issue and is going to be covered in this chapter.
One thing to consider about texture coordinates that may initially confuse beginners is that while the width of a 4-bit and 8-bit texture on VRAM varies from the actual width of the image itself, the texture coordinates does not need to be adjusted to take that into account as long as the correct color depth is specified in the texture page value. In this case, if you want to draw a texture at 96,24 from a 256x256 4-bit texture sheet, you just simply specify a U,V coordinate of 96,24 in your primitive as if the texture were still 16-bit.
 Texture coordinates are always true to the actual size of the
texture image
Texture coordinates are always true to the actual size of the
texture image
And because the U,V coordinates only have a range of 0-255, it is not possible to draw a texture image larger than 256x256 pixels regardless of color depth. To draw larger textures one has to draw multiple primitives to span the entire size of a larger image, trying to draw a SPRT primitive with a size greater than 256x256 will only result in a wrap around.
A texture page value is easily defined using the getTPage() macro. A function version of this macro is present in the PsyQ/Programmers Tool SDK as GetTPage(), but this is not available in PSn00bSDK as it would be considered redundant.
tpage = getTPage( tp, abr, x, y );
tp specifies the color depth for the texture page in the range of 0 to 2 (0:4-bit, 1:8-bit, 2:16-bit). abr specifies the blend operator for both non-textured and textured semi-transparent primitives which can be ignored for now and lastly, x,y specifies the X,Y coordinates of the VRAM in 16-bit pixel units. Keep in mind that the coordinates will be rounded down to the next lowest texture page.
Now that a texture page value has been defined, there are a number of ways to set it to the GPU. One is through the tpage field of the DRAWENV struct which specifies the initial texture page value whenever the drawing environment is applied. Another is to use a DR_TPAGE primitive which can be defined with the setDrawTPage() macro which follows the same syntax as getTPage(). DR_TPAGE is needed for SPRT primitives which lack a tpage field, though it is also useful for non-textured primitives to set the blend operator for semi-transparent primitives.
Because the PS1 usually processes primitives that have been sorted last first, DR_TPAGE primitives must be sorted after SPRT or other similar primitives have been sorted.
The following table describes the bit fields of a texture page value which may come in handy for the more crafty programmers.
| Bits | 15-14 | 13 | 12 | 11 | 10 | 9 | 8-7 | 6-5 | 4 | 3-0 |
|---|---|---|---|---|---|---|---|---|---|---|
| Description | Reserved | Y-flip* | X-flip* | Texture disable* | Draw on displayed area | Dither enable | Texture color depth | Blend operator | Texture page Y (n*256) | Texutre page X (n*64) |
| *Does not work on really early units, not recommended to use to maintain compatibility | ||||||||||
Whilst on the topic of texture page selection, when working with 4-bit and 8-bit texture images you will also need to use getClut() to define a CLUT value and is required for 4-bit and 8-bit texture images to draw properly. Obviously this is not required for 16-bit texture images.
clut = getClut( x, y );
x,y specifies the X,Y coordinate of the CLUT within the VRAM. However, keep in mind that the X axis must be a multiple to 16 pixels for a CLUT to be defined correctly as otherwise it will be rounded down to the lowest CLUT value.
As for selecting the CLUT, all textured primitives usually have a clut field in the struct in which the CLUT value can be set to. There is also a setClut() macro for setting CLUT coordinates to a primitive directly.
Usually, the coordinates for texture page and CLUT values are typically derived from the X,Y coordinates of the TIM image file to take into account TIM images that are not placed on the top-left corner of the texture page boundary.
The following describes the bit fields of a CLUT value.
| Bits | 15 | 14-6 | 5-0 |
|---|---|---|---|
| Description | Reserved | Y coordinate | X coordinate (n*16) |
There are numerous ways to convert image files into the TIM format, the most common is by using timtool from the official PsyQ/Programmers Tool SDKs, or at least those who chose to use that SDK. Another is to use my free but old command-line converter called img2tim, which follows the same command line syntax as bmp2tim but supports many more image formats supported by the FreeImage library and has better conversion options related to transparencies.
Perhaps the most preferable tool to use for those who've stuck to using PSn00bSDK is timedit, as not only is it free but also features a similar graphical interface to timtool, on top of extra features useful for managing a large amount of TIM images, such as grouping.
Whichever tool you use, convert the image below into a 8-bit TIM file with image coordinates of 640,0 and CLUT coordinates of 0,480. You will have to convert it into a 4-bit or 8-bit TIM as this tutorial is also going to cover how to work with CLUTs.

When converting the image, always remember that texture image and CLUT coordinates in the tools are always absolute coordinates to the VRAM regardless of color depth. And in case you're wondering, the PS1 cannot use 24-bit TIM images, as the GPU can only draw graphics in 16-bit color depth but can display 24-bit images by entering 24-bit color mode, but this is beyond the scope of this chapter.
In the meantime, the easiest way to include a binary file into your program
is to include it as an object file by means of a very simple assembler file,
and access that file as an array by defining its symbol name with
Save the following as
    opt	m+,l.,c+

    section data            ; Store the array in the data section

    global tim_my_image     ; Define label as global
tim_my_image:
    incbin 'my_image.tim'   ; Include file data (your TIM)
The name of the data is defined by the label, in this case
Assemble the file using
asmpsx /l my_image.asm,my_image.obj
Then link it with your program by simply specifying the object file.
ccpsx -O2 -Xm -Xo$80010000 my_image.obj program.c -o program.cpe
In PSn00bSDK, it works in much the same principle as in the PsyQ SDK,
but this one will be written in GNU assembler syntax. Save the assembler
file with a
.section .data

.global tim_my_image
.type tim_my_image, @object
tim_my_image:
    .incbin "my_image.tim"
It is recommended to use the makefile from one of the example programs included
with PSn00bSDK, as it has parameters for building with assembler files already
defined and should automatically pick your assembler file as long as it has
a
On both SDKs, the binary file can be accessed as an array by simply defining
it with an
extern int tim_my_image[];
If you get mismatching type errors when compiling, you can simply cast it with a
different pointer type with
To parse a TIM image file, use OpenTIM() to set the TIM file data for parsing and ReadTIM() to retrieve header information of the TIM file to a TIM_IMAGE struct. The TIM_IMAGE would contain not only a pointer to the X,Y and size coordinates of either texture image and CLUT but also pointers to the image and CLUT data within the TIM file.
In PSn00bSDK, GetTimInfo() function instead. It still returns the same TIM_IMAGE struct.
The TIM image coordinates are in the *prect field and CLUT in the *crect field, both are of type RECT. The actual texture image data is at *paddr and the CLUT data at *caddr. The color depth of the TIM file are in bits 0-3 of the mode field and CLUT presence is determined by testing bit 4.
Uploading either pixel or CLUT data is done using LoadImage(), followed by a call to DrawSync() to wait for texture upload to complete. Whilst you might be able to get away with not waiting for the texture upload to finish processing, it is recommended to wait for upload completion as unpredictable results may occur otherwise.
The TIM image upload function should go like this.
void LoadTexture(u_long *tim, TIM_IMAGE *tparam) {

    // Read TIM information (PsyQ)
    OpenTIM(tim);
    ReadTIM(tparam);

    // Read TIM information (PSn00bSDK)
    //GetTimInfo(tim, tparam);

    // Upload pixel data to framebuffer
    LoadImage(tparam->prect, (u_long*)tparam->paddr);
    DrawSync(0);

    // Upload CLUT to framebuffer if present
    if( tparam->mode & 0x8 ) {

        LoadImage(tparam->crect, (u_long*)tparam->caddr);
        DrawSync(0);

    }

}
In PSn00bSDK, you may additionally replace u_long to u_int. They are actually the same in PsyQ/Programmers Tool whereas in modern GCC/PSn00bSDK u_long usually defines a 64-bit unsigned integer.
Now that you have a TIM upload function, the TIM loading sequence should go like so.
extern int tim_my_image[];

// To keep a copy of the TIM coordinates for later
int tim_mode;
RECT tim_prect,tim_crect;

..

void LoadStuff(void) {

    // This can be defined locally, if you don't need the TIM coordinates
    TIM_IMAGE my_image;

    // Load the TIM
    LoadTexture((u_long*)tim_my_image, &my_image);

    // Copy the TIM coordinates
    tim_prect   = *my_image.prect;
    tim_crect   = *my_image.crect;
    tim_mode    = my_image.mode;

}
Reason you may want to keep a copy of the TIM coordinates separate from the TIM_IMAGE variable is that once you've figured out how to load files from CD and load the TIM file to a dynamically allocated buffer, relying on the TIM_IMAGE struct may not be a good idea as the *prect and *crect fields point to the TIM file data directly, and will most likely become undefined data once you've finished uploading that TIM to VRAM and deallocated its buffer in later parts of your program.
Now that a texture image has been loaded. The next thing to do is to set it's texture page to the drawing environment. Since there's only one texture to deal with, the texture page can be set to the DRAWENV struct.
draw[0].tpage = getTPage( tim_mode&0x3, 0, tim_prect.x, tim_prect.y );
draw[1].tpage = getTPage( tim_mode&0x3, 0, tim_prect.x, tim_prect.y );
To deal with TIMs that are not page aligned, the U,V offset relative to the TIM's rounded down texture page can be determined with the following and should work for texture images of any color depth.
int tim_uoffs,tim_voffs;

tim_uoffs = (tim_prect.x%64)<<(2-(tim_mode&0x3));
tim_voffs = (tim_prect.y&0xff);
Whilst this would allow texture images to not require being aligned to the top-left corner of the texture page boundary, texture images cannot cross between the vertical texture page bounds and for 4-bit texture images, should not cross the horizontal texture page bounds as otherwise trying to draw the texture image with a SPRT will result in wrapping in relation to the texture page.
Now to actually draw the texture image. This can be done with a SPRT primitive which simply draws a textured sprite of a specified size. It doesn't do fancy things such as rotation and scaling but its a useful primitive for drawing simple sprites.
SPRT *sprt;

...

sprt = (SPRT*)nextpri;

setSprt(sprt);              // Initialize the primitive (important)
setXY0(sprt, 48, 48);       // Position the sprite at (48,48)
setWH(sprt, 64, 64);        // Set sprite size to 64x64 pixels
setUV0(sprt,                // Set UV coordinates from TIM offsets
    tim_uoffs,
    tim_voffs);
setClut(sprt,               // Set CLUT coordinates from TIM to sprite
    tim_crect.x,
    tim_crect.y);
setRGB0(sprt,               // Set color of sprite, 128 is neutral
    128, 128, 128);

addPrim(ot[db], sprt);      // Sort primitive to OT
nextpri += sizeof(SPRT);    // Advance next primitive
When dealing with multiple texture images that tend to reside on different texture pages, you will have to sort a DR_TPAGE primitive right after the SPRT primitive that requires a particular texture page value set, as the PS1 processes primitives that are sorted last first.
Whilst not required in this chapter, this is how you sort a DR_TPAGE for when you start playing around with more texture images.
DR_TPAGE *tpage;

...

tpage = (DR_TPAGE*)nextpri;

setDrawTPage(tpage, 0, 1,       // Set TPage primitive
    getTPage(my_image.mode&0x3, 0,
    my_image.prect->x, my_image.prect->y));

addPrim(ot[db], tpage);         // Sort primitive to OT

nextpri += sizeof(DR_TPAGE);    // Advance next primitive address
A very simple optimization practice you may want to consider when you start getting into larger projects is that you only need to sort one DR_TPAGE primitive if all the sprites sorted prior share a common texture page.
Working from code in the last tutorial, here's what the code should look like:
#include <sys/types.h>	// This provides typedefs needed by libgte.h and libgpu.h
#include <stdio.h>	// Not necessary but include it anyway
#include <libetc.h>	// Includes some functions that controls the display
#include <libgte.h>	// GTE header, not really used but libgpu.h depends on it
#include <libgpu.h>	// GPU library header

#define OTLEN 8         // Ordering table length (recommended to set as a define
                        // so it can be changed easily)

DISPENV disp[2];        // Display/drawing buffer parameters
DRAWENV draw[2];
int db = 0;

// PSn00bSDK requires having all u_long types replaced with
// u_int, as u_long in modern GCC that PSn00bSDK uses defines it as a 64-bit integer.

u_long ot[2][OTLEN];    // Ordering table length
char pribuff[2][32768]; // Primitive buffer
char *nextpri;          // Next primitive pointer

int tim_mode;           // TIM image parameters
RECT tim_prect,tim_crect;
int tim_uoffs,tim_voffs;

void display() {

    DrawSync(0);                // Wait for any graphics processing to finish

    VSync(0);                   // Wait for vertical retrace

    PutDispEnv(&disp[db]);      // Apply the DISPENV/DRAWENVs
    PutDrawEnv(&draw[db]);

    SetDispMask(1);             // Enable the display

    DrawOTag(ot[db]+OTLEN-1);   // Draw the ordering table

    db = !db;                   // Swap buffers on every pass (alternates between 1 and 0)
    nextpri = pribuff[db];      // Reset next primitive pointer

}

// Texture upload function
void LoadTexture(u_long *tim, TIM_IMAGE *tparam) {

    // Read TIM parameters (PsyQ)
    OpenTIM(tim);
    ReadTIM(tparam);

    // Read TIM parameters (PSn00bSDK)
    //GetTimInfo(tim, tparam);

    // Upload pixel data to framebuffer
    LoadImage(tparam->prect, (u_long*)tparam->paddr);
    DrawSync(0);

    // Upload CLUT to framebuffer if present
    if( tparam->mode & 0x8 ) {

        LoadImage(tparam->crect, (u_long*)tparam->caddr);
        DrawSync(0);

    }

}

void loadstuff(void) {

    TIM_IMAGE my_image;         // TIM image parameters

    extern u_long tim_my_image[];

    // Load the texture
    LoadTexture(tim_my_image, &my_image);

    // Copy the TIM coordinates
    tim_prect   = *my_image.prect;
    tim_crect   = *my_image.crect;
    tim_mode    = my_image.mode;

    // Calculate U,V offset for TIMs that are not page aligned
    tim_uoffs = (tim_prect.x%64)<<(2-(tim_mode&0x3));
    tim_voffs = (tim_prect.y&0xff);

}

// To make main look tidy, init stuff has to be moved here
void init(void) {

    // Reset graphics
    ResetGraph(0);

    // First buffer
    SetDefDispEnv(&disp[0], 0, 0, 320, 240);
    SetDefDrawEnv(&draw[0], 0, 240, 320, 240);
    // Second buffer
    SetDefDispEnv(&disp[1], 0, 240, 320, 240);
    SetDefDrawEnv(&draw[1], 0, 0, 320, 240);

    draw[0].isbg = 1;               // Enable clear
    setRGB0(&draw[0], 63, 0, 127);  // Set clear color (dark purple)
    draw[1].isbg = 1;
    setRGB0(&draw[1], 63, 0, 127);

    nextpri = pribuff[0];           // Set initial primitive pointer address

    // load textures and possibly other stuff
    loadstuff();

    // set tpage of lone texture as initial tpage
    draw[0].tpage = getTPage( tim_mode&0x3, 0, tim_prect.x, tim_prect.y );
    draw[1].tpage = getTPage( tim_mode&0x3, 0, tim_prect.x, tim_prect.y );

    // apply initial drawing environment
    PutDrawEnv(&draw[!db]);

}

int main() {

    TILE *tile;                         // Pointer for TILE
    SPRT *sprt;                         // Pointer for SPRT

    // Init stuff
    init();

    while(1) {

        ClearOTagR(ot[db], OTLEN);      // Clear ordering table

        // Sort textured sprite

        sprt = (SPRT*)nextpri;

        setSprt(sprt);                  // Initialize the primitive (very important)
        setXY0(sprt, 48, 48);           // Position the sprite at (48,48)
        setWH(sprt, 64, 64);            // Set size to 64x64 pixels
        setUV0(sprt,                    // Set UV coordinates
            tim_uoffs,
            tim_voffs);
        setClut(sprt,                   // Set CLUT coordinates to sprite
            tim_crect.x,
            tim_crect.y);
        setRGB0(sprt,                   // Set primitive color
            128, 128, 128);
        addPrim(ot[db], sprt);          // Sort primitive to OT

        nextpri += sizeof(SPRT);        // Advance next primitive address


        // Sort untextured tile primitive from the last tutorial

        tile = (TILE*)nextpri;          // Cast next primitive

        setTile(tile);                  // Initialize the primitive (very important)
        setXY0(tile, 32, 32);           // Set primitive (x,y) position
        setWH(tile, 64, 64);            // Set primitive size
        setRGB0(tile, 255, 255, 0);     // Set color yellow
        addPrim(ot[db], tile);          // Add primitive to the ordering table

        nextpri += sizeof(TILE);        // Advance the next primitive pointer


        // Update the display
        display();

    }

    return 0;
}
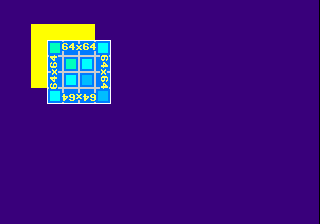
Compile the example, run it and you should get a yellow square cascaded by a sprite with your texture image.
You may notice that the untextured rectangle is drawn before the textured sprite even though the textured sprite was sorted first and the untextured rectangle last. That's because of the way how primitives are appended to the ordering table in addPrim(), where the primitive being sorted is linked right after a primitive that has been sorted to it previously, and the PS1 hardware parses the ordering table from the top of the array to the bottom with a reverse ordering table (created with ClearOTagR()).
 How primitives are appended to a preoccupied ordering table entry
Primitive 1 would be the SPRT primitive, Primitive 2 would be the DR_TPAGE primitive (if there was) and lastly, Primitive 3 would be the untextured TILE primitive. You may think that a reverse order ordering table makes no sense at first, but this technique is integral to the PS1's ability to do on-the-fly sorting of polygons when rendering 3D graphics.
Using getTPage(), getClut() and setClut() macros on every sprite sorted isn't exactly the most efficient way of doing things especially when drawing lots of sprites, not to mention makes your code look cluttered when managing several TIM images at once. This can be addressed by defining a struct that contains all the parameters you need precomputed for drawing a sprite.
typedef struct _SPRITE {
    u_short tpage;  // Tpage value
    u_short clut;   // CLUT value
    u_char  u,v;    // UV offset (useful for non page aligned TIMs)
    u_char  w,h;    // Size (primitives can only draw 256x256 anyway)
    CVECTOR col;
} SPRITE;

...

// Sets parameters to a MYSPRITE using coordinates from TIM_INFO

void GetSprite(TIM_IMAGE *tim, SPRITE *sprite) {

    // Get tpage value
    sprite->tpage = getTPage(tim->mode&0x3, 0,
        tim->prect->x, tim->prect->y);

    // Get CLUT value
    if( tim->mode & 0x8 ) {
        sprite->clut = getClut(tim->crect->x, tim->crect->y);
    }

    // Set sprite size
    sprite->w = tim->prect->w<<(2-tim->mode&0x3);
    sprite->h = tim->prect->h;

    // Set UV offset
    sprite->u = (tim->prect->x&0x3f)<<(2-tim->mode&0x3);
    sprite->v = tim->prect->y&0xff;

    // Set neutral color
    sprite->col.r = 128;
    sprite->col.g = 128;
    sprite->col.b = 128;

}
And to draw the sprite, you can write a simple function for it:
char *SortSprite(int x, int y, u_long *ot, char *pri, SPRITE *sprite) {

    SPRT *sprt;
    DR_TPAGE *tpage;

    sprt = (SPRT*)pri;                  // initialize the sprite
    setSprt(sprt);

    setXY0(sprt, x, y);                 // Set position
    setWH(sprt, sprite->w, sprite->h);  // Set size
    setUV0(sprt, sprite->u, sprite->v); // Set UV coordinate of sprite
    setRGB0(sprt,                       // Set the color
        sprite->col.r,
        sprite->col.g,
        sprite->col.b);
    sprt->clut = sprite->clut;          // Set the CLUT value

    addPrim(ot, sprt);                  // Sort the primitive and advance
    pri += sizeof(SPRT);

    tpage = (DR_TPAGE*)pri;             // Sort the texture page value
    setDrawTPage(tpage, 0, 1, sprite->tpage);
    addPrim(ot, tpage);

    return pri+sizeof(DR_TPAGE);        // Return new primitive pointer
                                        // (set to nextpri)

}
This method will also work for sprite sheets by simply modifying the GetSprite() function mentioned earlier such that you can specify an U,V offset relative to the TIM's U,V offset and the size of the sprite.
Instead of creating a single TIM image for each and every animation frame of your character sprite, it is best to compile such small images as one large image. This is called a sprite sheet and allows all sprite frames to share a common palette if you use 4-bit or 8-bit color depth. If all sprite frames have the same size, arrange the sprites in a grid where each cell is the same size as the sprites. This way you can compute the U,V coordinate of the sprites in the grid easily.
A 4-bit texture is faster to draw than a 8-bit texture, and a 8-bit texture is faster to draw than a 16-bit texture, as the GPU has to read less data from VRAM when drawing textures of lower color depth. Find a balance that achieves best possible performance without degrading the quality of your sprites or texture images too much.
The fixed size sprite primitives are a bit faster than SPRT primitives, making them best suited for particle sprites of a fixed size or when drawing tiles of a 2D map.
This technique is most applicable when drawing tile maps. If your tile sheet fits in a single texture page (less than 256x256), you only have to sort a single DR_TPAGE primitive for all the tiles. This may also help the GPU maintain texture cache coherency, as well as minimizing redundant primitive packets.
Texutures of any size can be used by the GPU, though it is recommended to make the width of 8-bit TIMs a multiples of 2 and multiples of 4 for 4-bit TIMs as mentioned earlier in this chapter.
This concludes Chapter 1.3. of Lameguy64's PSX Tutorial series. If you've sifted though this chapter well enough, you should have figured out how to handle TIM images, uploading them to VRAM and drawing them.
A few things you may want to experiment with for further learning:
| Previous | Back to Index | Next |